|
|
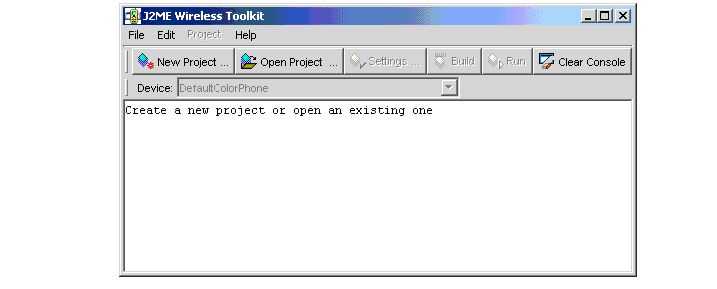
KToolbar is a minimal development environment for developing MIDlet suites. From the KToolbar, you can:
To run the KToolbar:
You can navigate through KToolbar windows (the main window, Profiling, Memory Monitor, and Network Monitor windows) using the Tab and arrow keys. Mnemonics on menus and buttons provide you with alternative means to initiating commands. A mnemonic is the underlined letter that corresponds to the keyboard key to press in conjunction with the Alt key to activate a command or to navigate to a component in the window.
You can press the Tab key to bring the focus to a particular component of a window and then use the arrow keys to manipulate that component.
A KToolbar project is associated with a MIDlet suite. The project contains the suite’s source, resource, and binary files, as well as the JAD and manifest files that contain the suite’s attributes.
Project files are located in project subdirectories under the Wireless Toolkit’s installation directory, {j2mewtk.dir}. The following table shows how files are organized within the directory for the project, {project.name}:
To create a new project:
The New Project dialog appears.
For example, you might call the project, newproject, and the MIDlet class might be myTest.Hello.
The main window’s title changes to include the name of the new project, as shown in FIGURE 3. The Project Settings API Selection tab is displayed as shown in FIGURE 4.
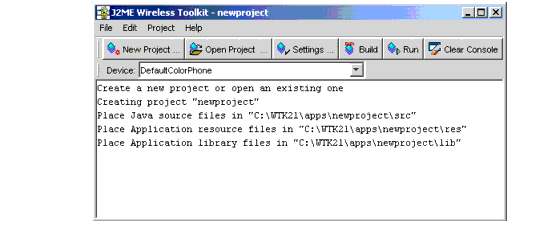
The console indicates where to place your source, resource, and library files. The locations are consistent with the project file organization outlined in TABLE 1.
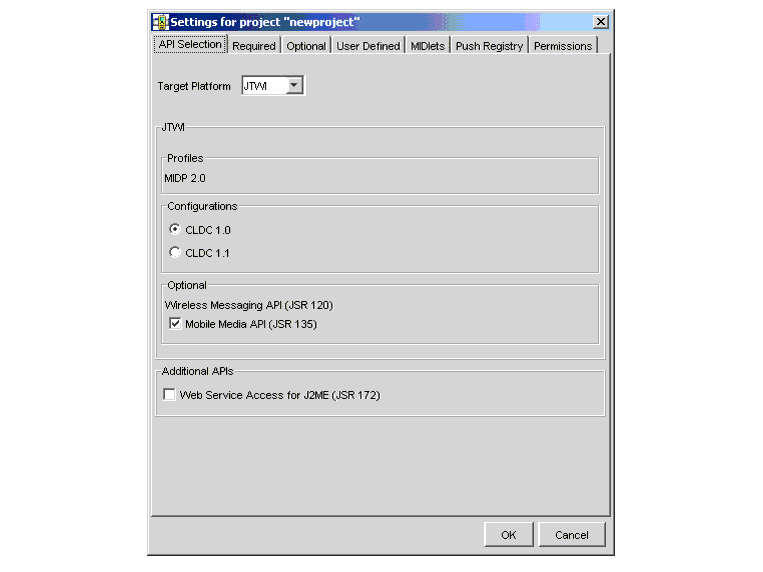
The target platform defines the set of APIs that are used for developing your MIDlet.
The target platform may be one of the following:
The project settings information and tabs change based on the selection you choose for the target platform. Some project settings are not applicable for a selected target platform. For example, the MIDP 1.0 target platform does not support Push Registry or Permissions, therefore the tabs are disabled. All project settings tabs are updated with information relevant to your selection. For example, if you selected the JTWI target platform, the MicroEdition-Profile value is updated in the Required tab.
To open an existing project:
This section explains how to use the project settings dialog to modify a MIDlet suite’s attributes. Use the project settings dialog box, shown in FIGURE 4, to edit a MIDlet suite’s project settings.
To open the Settings dialog box for the current project:
To change a required, optional, or user-defined MIDlet suite attribute:
For more information about the attributes themselves, see Appendix A, "MIDlet Attributes.”
You can also add or remove user-defined attributes through the User Defined tab in the Project Settings dialog box in the J2ME Wireless Toolkit.
To add a user-defined attribute:
The Add Property dialog appears.
The Add Property dialog disappears, and a new entry is created for the attribute.
To remove a user-defined attribute:
You can edit, add, or remove user-defined attributes through the MIDlets tab in the project settings dialog box in the J2ME Wireless Toolkit.
To edit an individual MIDlet’s name, icon, and class:
To add a MIDlet-specific attribute:
To remove a set of MIDlet-n attributes specific to a particular MIDlet:
To add a MIDlet to your project:
To change the order of the MIDlets in the suite (that is, the order in which they are listed when you launch the suite):
You can add and remove push registry attributes for MIDlets with the Push Registry tab in the project settings dialog box:
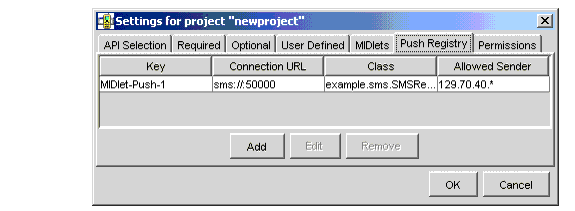
To register a MIDlet in the Push Registry:
MIDlet-<n>).*”, connections from any source are accepted. If datagram or socket connections are used, the value of Allowed Sender can be a numeric IP address.
The Key is the Push registration attribute name and is automatically generated. A MIDlet suite can have multiple push registrations. Each key (registration) designation is unique and of the form MIDlet-Push-<n>, where <n> begins at 1 and is incrementally increased with each registration. MIDlet Push registration information is stored in the MIDlet suite’s JAD file.
By selecting a key and clicking Edit or Remove, you can change the attributes for the selected key or remove it from the registry.
Note that the push registry functionality is only available when you are running in OTA provisioning mode. For more information on running using OTA provisioning in the Wireless Toolkit environment, see Chapter 2, "Developing and Running Applications.”
For your MIDlet suite to operate, it might need to access certain protected APIs. A request for permission to access these APIs is required. You can set the MIDlet-Permissions and MIDlet-Permissions-Opt attributes from the Permissions panel of the Project Settings dialog box.
To specify which APIs the current MIDlet suite can access:
The Permission API selection dialog box opens from which you can select the API permission to add. Shift+click to add multiple APIs at once.
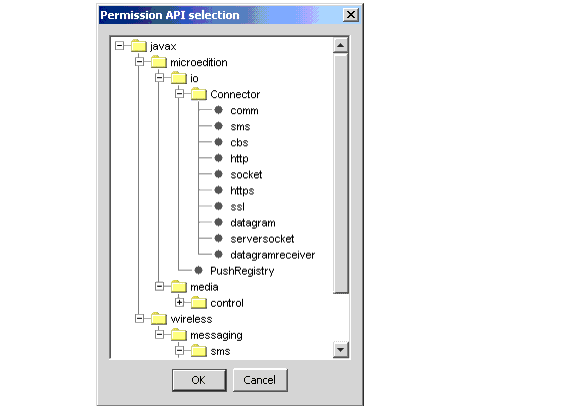
Permissions have the same naming structure as a Java class. For instance, javax.microedition.io.Connector.http is the permission for the HTTP protocol. To make use of the Push Registry, you must have permission to access the Push Registry API, javax.microedition.io.PushRegistry.
To remove API permissions:
The KToolbar compiles and preverifies source code in one sequence.
To compile and preverify your source code:
The classpath for compilation and preverification are based on the project's API selection. The preverifier is selected based on the version of the CLDC selected by the user. Compilation and preverification, can also be performed from the command line. For more information, see Appendix D, "Command Line Utilities.”
Once you have built your application, you can run it immediately from the KToolbar.
To run the current MIDlet suite in the Emulator using the KToolbar:
The list displays the devices available for the loaded application.
The Emulator appears, running your MIDlet suite. The console displays system and trace output as a MIDlet suite executes.
For information on running a project locally versus remotely, see Chapter 2, "Developing and Running Applications.”
You can debug an application from within the KToolbar by connecting to remote debugging facilities, such as an IDE debugger.
To debug an application under KToolbar:
The dialog asks you to enter a TCP/IP port number which the external debugger uses to connect to the emulator.
In most cases you can use the default value, but you should use another value if another application is using this port, or if you encounter problems connecting to the emulator from the debugger.
The emulator begins running in debugging mode, and waits for a connection from a debugger.
Make sure to set the remote debugger to run in remote mode and to use TCP/IP. For more information, consult the debugger’s documentation.
To remove obsolete or unnecessary files in your project directory:
You can create a package of your project files or create an obfuscated package that reduces the size of the Java bytecode, resulting in a smaller JAR file and possibly faster download times. Another benefit to creating an obfuscated package is to protect your code from possible decompilation.
To build a package:
Choosing Create Package creates a standard .jar file. When the classes are packaged, they are compiled without debugging information to reduce the size of the JAR file.
Choosing Create Obfuscated Package creates a .jar file of smaller size than a standard .jar file. Specifically how the contents of your package are obfuscated is dependent on the type of obfuscation tool you choose to use. When creating an obfuscated package, preverification is done after the code has been obfuscated rather than immediately after compilation. To use this feature, you must already have a bytecode obfuscator that is supported by the KToolbar.
A progress bar appears when packaging begins. When the packaging finishes, the output display indicates where the JAR and JAD files have been placed.
The Wireless Toolkit does not provide a bytecode obfuscator. It does, however, contain a plug-in for the ProGuard bytecode obfuscator.
To get the ProGuard bytecode obfuscator JAR:
proguard.zip file.proguard.jar file from the .ZIP file into the Wireless Toolkit’s bin directory: {j2mewtk.dir}\bin. If you choose to use a bytecode obfuscator other than ProGuard, you must implement the plug-in yourself. See the Wireless Toolkit Basic Customization Guide for an example of how to implement a bytecode obfuscator plug-in.
to the ktools.properties file located under WTK_HOME/wtklib/Windows directory. FileName is the name of your script file,
For more information about using script file formats, see the Proguard documentation.
After packaging the application, you can sign your MIDlet suite if needed by choosing the Sign command from the KToolbar’s Project menu. For information on signing MIDlet suites, see Chapter 6, "Using Security Features in the Wireless Toolkit.”
When your MIDlets are packaged (and signed if needed), you can emulate OTA provisioning and run your application by choosing the Run via OTA command from the KToolbar’s Project menu. A graphical AMS is started and you can simulate the downloading and execution of your application from a web server. Running in OTA provisioning mode, enables you to test certain MIDP 2.0 features such as package validation, MIDlet suite authentication, and push functionality. For information on running using OTA provisioning in the Wireless Toolkit, see Chapter 2, "Developing and Running Applications.” For alternative ways of running in OTA provisioning mode, see Chapter 8, "Testing Application Provisioning.”
KToolbar enables you to build projects from source and resource files. You may want to use a class library for which you do not have source files. This section shows you how to build a project using an external class library.
Be cautious when including external class libraries. Adding unnecessary class libraries to a project increases both the time needed to package it and the size of the resulting MIDlet suite JAR file. A large JAR file increases the time needed to load the MIDlet suite, and could prevent it from running on devices with low memory.
Class libraries for use with KToolbar should be compatible with the CLDC and MIDP APIs and should be packaged in .jar or .zip format. KToolbar provides ways for you to develop applications using class libraries, both on a per project and on a global basis.
To add class libraries to a KToolbar project:
The application’s directory contains a subdirectory, lib.
For example, if you installed the J2ME Wireless Toolkit in C:\wtk21 and your application is called ExampleMIDlet, the class library would go in the directory, C:\wtk21\apps\ExampleMIDlet\lib. When you build, run, debug, and package your project, the class files in the lib directory are used.
You can also define class libraries to be available for all projects that you develop with KToolbar. To do this, place the JAR or ZIP files containing the classes in the subdirectory apps\lib of the directory in which you installed the J2ME Wireless Toolkit. For example, if you installed the Wireless Toolkit in C:\wtk21, you would place the class libraries in C:\wtk21\apps\lib. Class libraries in the apps\lib directory are used for all projects.
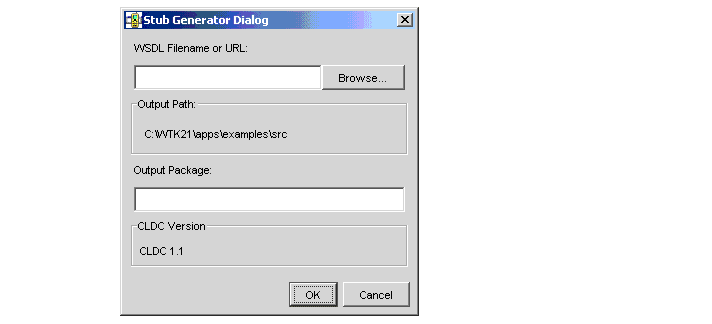
You can generate a stub connector to access Web Services from the KToolbar. The Emulator is compliant with the J2ME Web Services Specification (JSR-172). The stubs are created using a Web Service Descriptor Language file.You can also generate a stub connector from the command line. See Appendix D, "Command Line Utilities.”
To generate a stub connector:
The Output Path is the location where the Stub Generator will place the generated files.
The Output Path and the CLDC version default to the project settings if you generate a stub connector from the Project menu, as shown in FIGURE 9. Both options are from the KToolbar.
The Output Package name is the package name that the stub will be generated in.
You can access the Emulator’s Preferences and Utilities tools through the KToolbar menu.
To access the Emulator Preferences tool:
To access the Emulator Utilities tool:
For more information on using the Emulator Utilities and Preferences tools, see "Preferences and Utilities" in Chapter 5, "Working With the Emulator.”
KToolbar includes some advanced configuration options. You can use these options by editing the file {j2mewtk.dir}\wtklib\Windows\ktools.properties. To see the effects of your changes, restart KToolbar.
By default, the J2ME Wireless Toolkit stores MIDP applications in directories under {j2mewtk.dir}\apps. You can change this by adding a line to ktools.properties of the following form:
Any backslash ('\') characters in the directory’s path should be preceded by another backslash. Also, the directory’s path should not contain any spaces.
For example, to set the application directory to D:\dev\midlets, you would use:
By default, the Java compiler uses the encoding set in the J2SE environment that you are running. For information on how to override the default source file encoding, see "Java Compiler Encoding Setting" in Appendix C, "Internationalization.”
Using the filterRevisionControl property, you can configure KToolbar to recognize and ignore auxiliary files created by the SCCS, RCS and CVS revision control systems.
To recognize and ignore auxiliary files, include the following line in ktools.properties:
As a result, you prevent KToolbar from treating revision control files as source and resource files. For example, KToolbar would treat a file named src\SCCS\s.MyClass.java as being an SCCS revision control file and not a Java source file.
|
|
User's Guide Java™ 2 Platform, Micro Edition, Wireless Toolkit, Version 2.1 |
Copyright © 2003 Sun Microsystems, Inc. All rights reserved.