

|
This chapter describes the MIDP application development life cycle in the context of working with the Wireless Toolkit and the ways in which you can run an application (MIDlet suite) during its development cycle:
Developing an application usually involves the following steps:
For information on how to build, run, and debug using the KToolbar, see Chapter 3, "Operating with KToolbar.”
For information on what is involved with packaging and running an application remotely, see the following section, "Running Applications Remotely.”
Once your application is in a stable state, you are ready to see how your application performs in a more realistic environment, that is the downloading and running of your application onto a mobile device from a browser or server.
At this point, you will want to run your application using Over-The-Air (OTA) provisioning. The J2ME Wireless Toolkit simulates OTA provisioning, that allows you to test the functionality of your application and demonstrate the full provisioning process of your MIDlet suite from a web server to a device. With simulated OTA provisioning in the Wireless Toolkit, the MIDlet suite is packaged in the JAR and JAD format, deployed to the provisioning server, and downloaded to an emulated device.
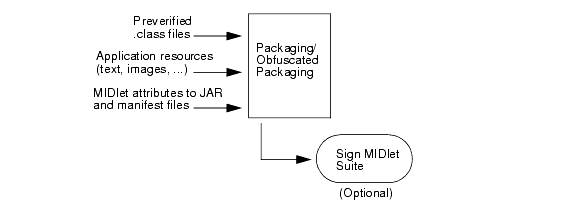
To run using OTA provisioning, you need to package your MIDlets into a MIDlet suite, and sign the MIDlet suite if authentication is required:

MIDP applications, or MIDlets, are packaged into a MIDlet suite, a grouping of MIDlets that can share resources at runtime.
A MIDlet suite includes:
For more information on what attributes can be added to the JAD and manifest files, see Appendix A, "MIDlet Attributes.”
A package validation process, which occurs during OTA provisioning, checks for consistency in content between the JAD, JAR, and manifest files.
Development environments such as KToolbar and the Sun ONE Studio 4, Mobile Edition automate the packaging of MIDlet suites and ensure the correct packaging of the JAR and JAD files. (For information on how to package applications using KToolbar, see "Packaging" in Chapter 3, "Operating with KToolbar.”
An optional feature provided by the J2ME Wireless Toolkit is the ability to build an obfuscated package. In addition to protecting your source code, the obfuscation process reduces the size of the classes resulting in smaller JAR files. For information on creating packages and obfuscated packages, see "Packaging" in Chapter 3, "Operating with KToolbar.”
An optional step after packaging, is signing the MIDlet suite. The signing process creates a digital signature for the MIDlet suite’s JAR file, and adds it to the JAD file. To facilitate the signing process, you can start the process immediately by running the Sign command from the KToolbar’s Project menu. For more information on security features in the Wireless Toolkit and signing a MIDlet suite, see Chapter 6, "Using Security Features in the Wireless Toolkit.”
When you are ready to test the behavior of your MIDlet suite, you can run the application in provisioning mode directly from the KToolbar. Running an application through provisioning differs from running an application directly on the emulated device in several ways. The following MIDP 2.0 features can be tested only when using OTA provisioning:
By choosing the Run via OTA command from the KToolbar’s Project menu, you can run your application in such a way as to simulate deployment from a web server. The command starts a default emulator device with a graphical Application Management System (AMS) already started and ready to install your application. In addition, if authentication is required, you can run the Sign command from the Project menu to perform the signing process for your MIDlet suite.
To run your application in OTA provisioning mode:
For information on entering text in the Emulator, see "Inputting Text" . The AMS attempts to install the application described by the JAD file.
For information on OTA provisioning, see "Over The Air User Initiated Provisioning Specification," in the MIDP 2.0 specification at
http://java.sun.com/products/midp.
For information on deploying and testing your applications with a real web server, see Chapter 8, "Testing Application Provisioning.”


|
User's Guide Java™ 2 Platform, Micro Edition, Wireless Toolkit, Version 2.1 |
Copyright © 2003 Sun Microsystems, Inc. All rights reserved.