


|
|
The J2ME Wireless Toolkit incorporates the enhanced security features provided in MIDP 2.0 and provides you with tools to facilitate using these new security features. These improved security features provide you with:
Once you have built and packaged your MIDlet suite, you can use the security utilities provided by the J2ME Wireless Toolkit to sign it. The J2ME Wireless Toolkit enables you to either sign a MIDlet suite with an existing public and private key pair or with a new key pair that you generate. Each key pair is associated with a certificate. Assigning a security domain to the certificate, designates the level of trust the certificate holder has to access protected APIs and the level of access to those APIs.
MIDlet suites can be assigned one of the following domain types:
The signing process is ordinarily a complex procedure involving the keytool utility, JADtool, and the MEKeytool. The toolkit’s security utilities consist of graphical user interfaces that call on these tools for you. It enables you to complete the entire signing process without having to resort to command-line utilities. With the security utilities, you can:
When a key pair is created in the J2ME Wireless Toolkit, the certificate is stored in the ME keystore file.
For a thorough description of the MIDP 2.0 security model, see the MIDP 2.0 specification at http://java.sun.com/products/midp.
If you need to create a key pair, you can use the New Key Pair dialog box to generate one. You must specify an alias, distinguished name, and organization. The utility then creates a public and private key that are referenced by the alias. The key pair is stored in a keystore. A certificate for the key pair is also generated and you are asked to specify a security domain to be associated with the certificate. The certificate associated with the key pair is then automatically imported to the DefaultEmulator’s keystore. You can then sign the MIDlet suite.
To create a new key pair:
The Sign MIDlet Suite window opens. Another way to open the Sign MIDlet Suite window is to choose File -> Utilities and click the Sign MIDlet button.
These are the minimum fields required to create a key pair.

The key pair is generated and the alias is added to the list of aliases in alphabetical order:
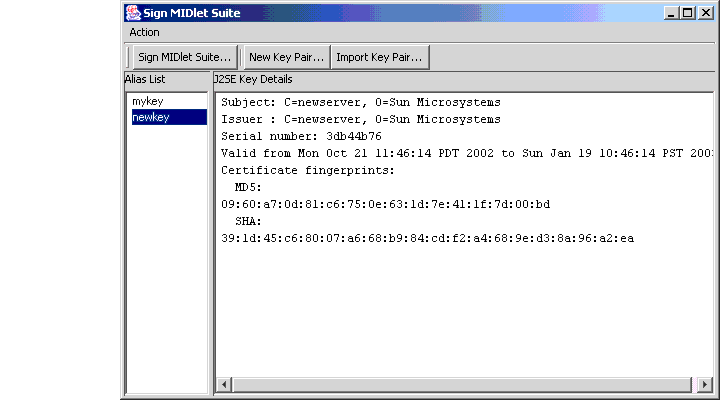
You can view certificate and key information in the J2SE Key Details pane. The information displayed includes the distinguished name (DN) of the certificate subject and issuer, the serial number of the certificate, the period of validation for the certificate, the cryptographic algorithm used, and the certificate authorizer’s digital signature. A copy of the certificate is automatically stored in the Default Emulator’s keystore.
The certificate is copied to the .jad file. The JAR file is digitally signed. A confirmation dialog box appears when the signing is successful. If the signing was not successful, an error dialog box appears with a brief message briefly stating why the signing could not take place.
You can sign a MIDlet suite with an existing key pair:

A confirmation dialog box appears when the signing is successful. If the signing was not successful, an error dialog box appears with a brief message briefly stating why the signing could not take place.
To remove a key pair:
A confirmation of deletion dialog box appears. Click Yes to continue the deletion operation. The alias is removed from the list and the key pair the alias referenced is deleted from the keystore.
The Default Emulator comes with a default set of certificates. Certificates are used to check the validity of network connections and to check the validity of signed MIDlet suites. If you are using a secure protocol to access a web site, such as HTTPS or SSL, the web site’s certificate is checked to see if it is valid. The MIDlet suite’s certificate is also checked to see if it has permission to access the site. If the site’s certificate is not valid or if the MIDlet suite does not have permission, access to the site is denied. When you are simulating a network transmission, the certificates in the Default Emulator’s keystore are checked. For information on how to add API permissions for network protocols for use within the Wireless Toolkit environment, see "Adding API Permissions" in Chapter 3, "Operating with KToolbar.”
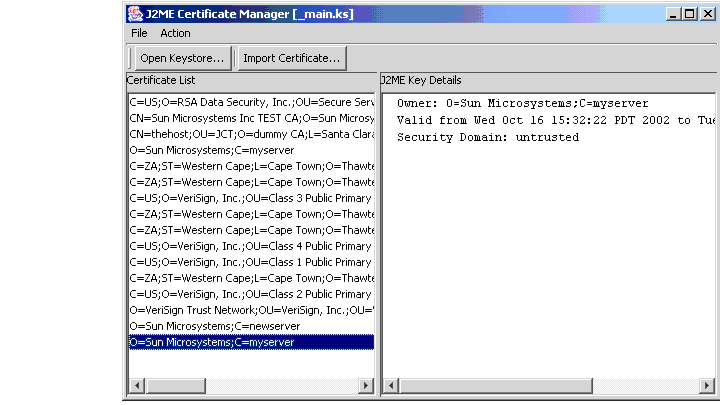
A Certificate Manager is provided by the J2ME Wireless Toolkit to help you maintain the certificates in the Default Emulator’s keystore (J2ME keystore). If you want to add a certificate to the Default Emulator’s set of certificates, you can use an existing certificate from the J2SE Keystore by importing it to the Default Emulator’s keystore or you can generate a request for a certificate from a recognized certificate authority (CA) and import the certificate you receive into the Default Emulator’s keystore. When a certificate expires or you no longer need a certificate, you can delete them from the keystore.
You can always see which certificates are in the J2ME Keystore by viewing the certificates list displayed in the Certificate Manager. You can also use the command line utility, MEKeyTool, to see the list of certificates. For information on using MEKeyTool, see Appendix D, "Command Line Utilities.”
To see the list of certificates:
You can import a certificate from a J2SE Keystore into the J2ME Keystore or you can generate a request for a certificate from a recognized certificate authority (CA) and import the certificate you receive into the J2ME Keystore.
To open the Certificate Manager:
To import a certificate from a J2SE Keystore using the Certificate Manager:
The default keystore file is keystore.sks.
The password for the default keystore is password.
The certificate is appended to the list of certificates in the J2ME Keystore. You can select the certificate to view its key information in the J2ME Key Details pane.
To obtain a certificate from a CA, you must generate a request for the certificate. Once you have received the certificate, you can import it to the Default Emulator’s keystore through the Certificate Manager.
To import a new certificate that you received from a CA:
The certificate has a .cer extension.
The certificate is copied to the Default Emulator’s keystore (J2ME keystore) and appended to the list of certificates in the Certificate Manager. You can select the certificate to view its key information in the J2ME Key Details pane.
If you have certificates in more than one keystore file in the J2ME keystore, you can open a specific keystore file from the Certificate Manger to view the certificates in that keystore. You can also use the Certificate Manager to delete certificates in that keystore file.
To open another keystore:
You can use the Delete function in the J2ME Certificate Manager to delete a certificate in the J2ME Keystore.
To remove a certificate:
|
|
User's Guide Java™ 2 Platform, Micro Edition, Wireless Toolkit, Version 2.1 |
Copyright © 2003 Sun Microsystems, Inc. All rights reserved.