


|
|
This chapter explains in detail the structure and content of device property files for an emulated device.
The following is the list of the main behavior items that can be specified in the device property files:
By creating a new set of device property files, you can customize the behavior of the items that are described above to fit with the behavior of the real device. The folder wtklib\devices in the binary release of the J2ME Wireless Toolkit contains the device property files.
The syntax of device property files is that of the standard Java 2 Standard Edition property resources. For a description of the syntax, see the method detail for the load method for the Properties class at the following website:
http://java.sun.com/j2se/1.4/docs/api/java/util/Properties.html#load(java.io.InputStream)
For a description of the structure and content of device property files, see "Device Property Files" .
The device property files consist of a set of files that define the device’s behavior and appearance. Each set of device property files is located in a directory whose name determines the name of the device.
{j2mewtk.dir} is used to refer to the directory in which the J2ME Wireless Toolkit is installed. For example, if you installed the J2ME Wireless Toolkit in the default directory C:\WTK21 then {j2mewtk.dir}\wtklib represents C:\WTK21\wtklib.
The device property directory must be located in {j2mewtk.dir}\wtklib\devices so that it can be used by the J2ME Wireless Toolkit.
For example, TABLE 1 lists the device property file for a device named DefaultGrayPhone and the shared property files used by all the devices provided with the Wireless Toolkit. The DefaultGrayPhone device property file is located at {j2mewtk.dir}\wtklib\devices\DefaultGrayPhone in the binary installation. The shared device property files are located at {j2mewtk.dir}\wtklib\devices\Share in the binary installation.
See Appendix A, "Default Emulator Device Property Files” for a full example of device property files.
This section describes the device property file that the Default Emulator uses to emulate a device.
The Main Device Property file is named <device_name>.properties and is located in the directory <device_name> where device_name is the name of the device being emulated. For example, the Main Device Property file for a device named DefaultGrayPhone would be at {j2mewtk.dir}\wtklib\devices\DefaultGrayPhone. The Main Device Property file contains the information needed to define the device's appearance and behavior, as well as pointers to associated property files.
\DefaultGrayPhone.properties
The Main Device Property file contains definitions for the following items. Each is discussed in detail in the sections below.
There are two types of fonts available for displaying text on the device screen:
The device property file can specify the fonts used by the implementation of the MIDP graphics API.
A font is specified by the MIDP APIs by the property:
where
“system”, “monospace”, or “proportional” The font definition is according to the format for describing a system font (see "System Fonts" ) or a bitmap font (see "Bitmap Fonts" ).
The default font (see "Default Font”) is used for any MIDP font combination that is not defined.
A default font must be specified. This font is used in all cases where no other definition was given.
The default font is specified as follows:
A system font definition is in the standard Java format for specifying such a font. For details, see
http://java.sun.com/j2se/1.4/docs/api/java/awt/Font.html.
You can tell the Emulator to use the resident PC fonts to display text on the device screen.
Use the font specification in the form:
To tell the Emulator to use a bitmap font, you need to specify a font property file that describes the font:
A font property file contains definitions for the following properties:
font_image = <image_filename>

font_height = <pixel_height_font>

font_ascent = <pixel_ascent_font>

font_descent = <pixel_descent_font>

font_leading = <pixel_space_between_lines_of_text>
The first property, font_image, refers to an image file, in PNG, GIF or JPEG format, that contains the font bitmap. The form of the bitmap should be a row of characters, as shown in FIGURE 4.
The other properties listed above define other characteristics of the font:
For a complete description of height, ascent, descent and leading as they relate to fonts, see
http://java.sun.com/j2se/1.4/docs/api/java/awt/FontMetrics.html
The bitmap font property file contains a list of properties of the form:
where <n> is a number between 0 and 256, and the given pixel location refers to the start of that character's definition in the font bitmap. The characters must be adjacent in the image, so that one character ends where another begins. The following image shows the interpretation of the horizontal pixel locations:

ascii_x-0 = 0

ascii_x-1 = 0

..

ascii_x-32 = 0

ascii_x-33 = 8

..

ascii_x-254 = 1149

ascii_x-255 = 1154

ascii_x-256 = 1160
The MIDP specification allows underlined fonts. By default, the emulator supports font underlining. You can disable this feature for all fonts by setting the property:
It is also possible to disable underlining for a specific font by setting the property:
Where face, style and size are as described in "Fonts Used by the MIDP APIs" .
It is possible to specify the thickness of the line used for underlining by a line of the form:
The default width of the line is one pixel for plain and italic font styles and two pixels for the bold font style.
It is also possible to specify the distance of the line used for underlining from the font baseline by a line of the form:
The default offset is one pixel for all fonts.
To specify the device image, you need to specify three separate device graphic images. These image files should differ only in their representation of active buttons (those buttons that are to be used in the emulation of the device in the J2ME Wireless Toolkit).
The image files are:
Image files can be in GIF, PNG, or JPEG format.
To specify a device image without the buttons pressed, enter a line of the form:
For example,
To specify a device image with the buttons pressed, enter a line of the form:
For example,
To specify a device image with the buttons highlighted and backlighting on, enter a line of the form:
For example,
To scale the device image, use an entry of the following form:
For example, the following entry expands the device image to twice its original width and height:
In this section you specify the properties of the image of the device screen. You need to specify the following screen properties:
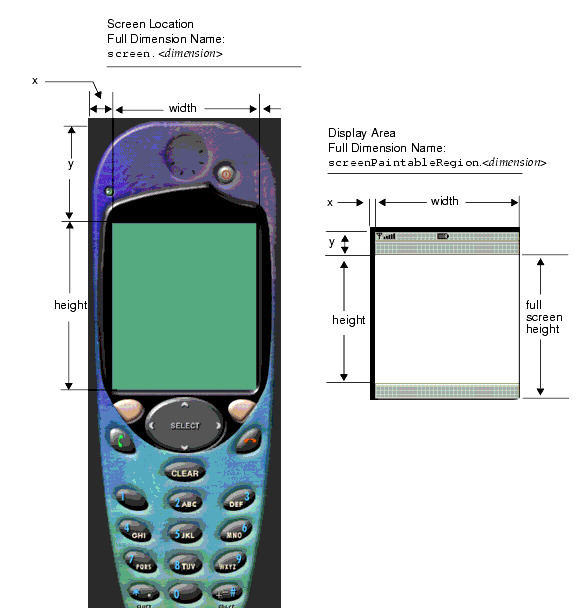
Referring to the left image in FIGURE 5, you specify the location of the top left corner of the screen relative to the top left corner of the device image by two lines of the form:
For example:
Referring to the left image in FIGURE 5, you specify the total screen size by two lines of the form:
For example:
Referring to the right image in FIGURE 5, the display area (or Paintable Region) is that part of the screen that is available to applications. The remainder of the screen is for icons and soft button labels.
The coordinates of the display area are relative to the screen location.
You can specify the display area used by the application to be a subregion of the screen by four lines of the form:
screenPaintableRegion.x = <horizontal distance to display area>

screenPaintableRegion.y = <vertical distance to display area>

screenPaintableRegion.width = <width of display area>

screenPaintableRegion.height = <height of display area>
For example:
screenPaintableRegion.x = 4

screenPaintableRegion.y = 8

screenPaintableRegion.width = 88

screenPaintableRegion.height = 100
The MIDP 2.0 specification allows applications to use the full screen area.
Referring to the right image in FIGURE 5, the full screen display area is defined as the upper left coordinate of the display area, (screenPaintableRegion.x, screenPaintableRegion.y), and the bottom right coordinate of the screen area (screen.x+screen.width, screen.y+screen.height).
Customization of the display area will be available in future versions of the Wireless Toolkit.
The following commands enable you to compensate for the difference in aspect ratio between the actual device screen and the device image on the PC screen.
The pixel size ratio property defines the number of pixels in the device’s PC image that correspond to a single pixel on the real device in both the horizontal and vertical direction.
The ratios are defined as follows:
screenPixelRatio.x = horizontal_image_pixels/horizontal_device_pixels

screenPixelRatio.y = vertical_image_pixels/vertical_device_pixels
For most devices, use the following values:
The values of screenPixelRatio.x and screenPixelRatio.y must be whole numbers.
For a device with a grayscale screen, the background color of the screen can be set. The color is defined as a hexadecimal integer according to the standard Java color map. That is, the integer has the form RRGGBB, where RR, GG, and BB are the red, green and blue components of the color, respectively. For example, white would be 0xffffff and red would be 0xff0000.
The background color is defined with the property screenBGColor.
For example:
You have the option of setting the color of the icon area, the softbutton area (non-paintable areas), and the device menu. Screen background color is used if this value is not defined. The color is defined as a hexadecimal integer according to the standard Java color map. That is, the integer has the form RRGGBB, where RR, GG, and BB are the red, green and blue components of the color, respectively. For example, white would be 0xffffff and red would be 0xff0000. The screen border color is defined with the property screenBorderColor.
For example:
You can define whether or not your device should respond to mouse activity on its screen. This is done by defining a property touch_screen to be either true or false.
For example, setting
causes the device to respond to mouse activity on its screen.
The default value is:
touch_screen property in MIDlets that are specifically written for touch screens, such as the PushPuzzle demonstration game included with the J2ME Wireless Toolkit. The user interface widgets in the Default Emulator do not respond to touch screen events (for example, you cannot select an item from a list by clicking on it with the mouse.)
By default, output from a MIDlet to the screen is buffered, so the screen is not updated every time the application draws a line or writes some text. Instead, when the application is ready, it signals MIDP that its drawing operations are complete, and only then is the screen updated.
To see screen updates happen immediately, use the following entry:
Use this entry if you want your applications to perform fewer drawing operations, or if you are emulating a device that does not buffer screen output.
This section describes how to define a button on an emulated device and also describes the assignments associated with the buttons including:
The set of names available for device buttons depends on the keyboard handler being used.
There are two built-in keyboard handlers in the Toolkit:
DefaultKeyboardHandler)QwertyKeyboardHandler)
You specify the keyboard handler by the keyboard.handler property, which gives the name of the class to be used.
For example:
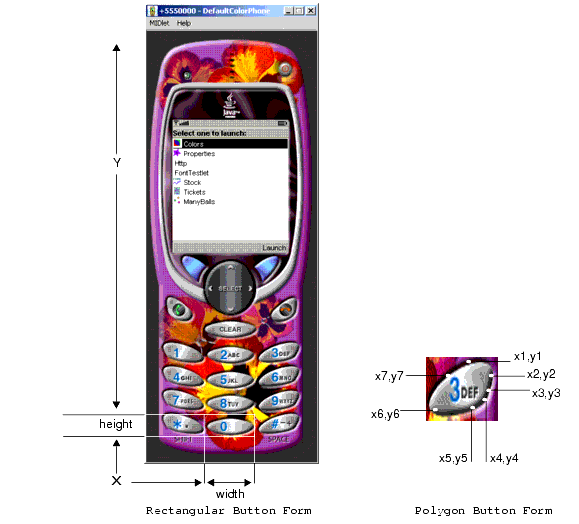
A button on the emulated device is defined in the main device property file by name and screen location in one of the following forms:
For the first form (rectangular), the parameters are as follows:
For example,
For the second form (polygonal), the definitions for button_name, x, and y are the same as for the rectangular form. The polygonal form can consist of multiple points defined by x and y coordinates. A minimum of three sets of x and y coordinates are required to use this form.
For example, if the LEFT button were polygonal, it could have the following values:
button.LEFT = 166, 420, 143, 432, 143, 406
The button location and dimensions are used for two purposes:
The region for each button should be defined to be large enough to cover the button's area on all three device images. However, be careful not to allow the buttons' regions to overlap each other.
The button coordinates are shown in FIGURE 6.
You can assign a key on the PC keyboard to a device button in order to simulate a button press by pressing the key (instead of clicking on the button with the mouse).
You use a line of the form:
java.awt.event.KeyEvent atFor example,
More than one PC key may be assigned to a single button, using the form:
where the virtual key codes are separated by spaces.
For example,
The QwertyKeyboardHandler also allows the MIDP game actions to be mapped to device buttons. You use a line of the form:
where function can be one of LEFT, RIGHT, UP, DOWN and SELECT and button_name is the name of a button as shown in TABLE 2.
The default settings are:
When using the QwertyKeyboardHandler, you can also specify the character generated by a button press either alone or in combination with the Shift or Alt buttons.
You use a line of the form:
keyboard.handler.qwerty.<button_name> = '<base character>' '<shift character>' '<alternate character>'
where base character is the character the button normally generates, shift character is the character used when the button is pressed at the same time as Shift, and alternate character is the character generated when the button is pressed at the same time as Alt.
There are two ways you can do a button press at the same time as pressing Shift or Alt:
For example:
Abstract commands are provided in the MIDP specification in order to allow an application to issue a screen command without having to take into account how the user selects that command on a specific device—making the application more portable. The idea is to separate the semantics of the command from its execution on the device. The semantics are defined in the application and the execution is defined in the implementation of MIDP on the specific device.
The semantics of an abstract command include:
In the MIDP Reference Implementation, which underlies the J2ME Wireless Toolkit, there is an implicit order of precedence among the command types. This command precedence also impacts on the assignment of a command to a preferred button. If two commands of different types are vying for the same button, the command whose type has higher precedence prevails.
TABLE 3 shows the abstract command types in order of precedence in the J2ME Wireless Toolkit and the MIDP Reference Implementation:
The MIDP implementation in the Wireless Toolkit allocates a command issued by the application to a device button based on the following considerations:
The J2ME Wireless Toolkit allows a variety of abstract command mapping policies to be implemented. An emulated device can use a combination of soft buttons and dedicated command buttons to implement abstract commands, or it can have none of these and just present all abstract commands to the user in an on-screen menu. The J2ME Wireless Toolkit includes examples of different configurations (see the Wireless Toolkit User’s Guide).
The Emulator provides the device property file definitions command.keys.<command_type> and command.menu.<action> to emulate the way a MIDP implementation on the corresponding real device assigns abstract commands to buttons and menus.
You specify the button assignments following the considerations specified at the end of the previous section:
command.menu.activate and command.menu.<action> to assign the menu operations to buttons. See "The Abstract Command Menu" .command.keys.<command_type> to assign command types to preferred buttons according to their natural correspondence. See "Assigning an Abstract Command Type to a Button" In the J2ME Wireless Toolkit, commands are assigned to buttons according to the following order of preference:
First, the menu operations are assigned to the buttons that are defined for them. Then the abstract commands are assigned. Abstract command precedence is taken into account before abstract command priority. Thus, if a command of type BACK with priority 2 and a command of type EXIT with priority 1 are competing for a button, the BACK command will get the assignment due to its higher precedence. Command priority is taken into account only when the two commands have the same type.
You assign an abstract command type to a button using a property definition of the form:
where <type> is one of the abstract command types shown in TABLE 3. The button name is one of the names listed in TABLE 2.
If you want to assign command types to the two soft buttons as follows:
you would enter the following definitions in the main device property file:
command.keys.BACK = SOFT1

command.keys.EXIT = SOFT1

command.keys.CANCEL = SOFT1

command.keys.STOP = SOFT1

command.keys.OK = SOFT2

command.keys.SCREEN = SOFT2

command.keys.ITEM = SOFT2

command.keys.HELP = SOFT2
In cases of conflict in the mapping of actual commands to keys, commands are mapped first by command type and then by priority.
Secondary buttons may be defined for a command type. If a command is unable to be assigned to the preferred button for its type because another command with higher precedence (due to either its type or its priority) has taken the button, the command can be assigned to an alternative button.
This is done by specifying more than one button name in the property definition where the names are separated by spaces:
The first definition below assigns commands of type BACK to the END key and alternatively to the SOFT1 key. The second definition assigns commands of type OK to the SEND key and alternatively to the SOFT2 key.
Only certain command types might be allowed for a specific soft button, which means that other command types will not be assigned to that soft button in any case, even if that soft button is left unassigned.
You restrict command types to a button by specifying a list of one or more command types in the property definition:
The following definition allows only the command types BACK, EXIT, CANCEL, and STOP to be mapped to the SOFT1 key.
When there are more abstract commands specified by an application than there are buttons to which they can be mapped, the unmapped abstract commands are placed in a command menu. The following operations are defined for the command menu:
These menu operations are assigned to buttons as described below.
One button is used to alternately display and hide the menu. It is defined by the property command.menu.activate using the format:
The buttons used to navigate the menu are defined using the following properties:
command.menu.select = <menu_select_key>

command.menu.up = <menu_up_key>

command.menu.down = <menu_down_key>
The default values for these properties are:
This example sets the menu to be activated by the SOFT2 key and to be navigated with the standard keys.
You can customize the title of the menu as well as the label of the soft button used to display and hide the menu. Use the following properties:
The default values for these properties are:
An icon in the context of the Emulator is any graphic, constant or variable, that is displayed on the device screen global region (the region that is outside of the drawable area). This includes scrolling indicators, the battery level indicator and any other images of a similar type.
An icon is defined by:
The screen location and initial state of the icon is defined by a line of the form:
The icon states are defined by lines of the form:
icon.<name>.<state #1> = <state #1 image_filename>

..

icon.<name>.<state #n> = <state #n image_filename>
If an icon does not have an image for a particular state, only the name of the icon need be given, and the image field can be left blank.
Image files can be in GIF, PNG, or JPEG format.
For example:
icon.up: 44, 110, off

icon.up.off:

icon.up.on: up.gif


icon.down: 44, 118, off

icon.down.off:

icon.down.on: down.gif


icon.internet: 64, 0, off

icon.internet.off:

icon.internet.on: internet.gif


icon.reception: 0, 0, on

icon.reception.on: reception.gif


icon.battery: 80, 0, full

icon.battery.full: batt_3.gif

icon.battery.half: batt_2.gif

icon.battery.low: batt_1.gif

icon.battery.none: batt_0.gif
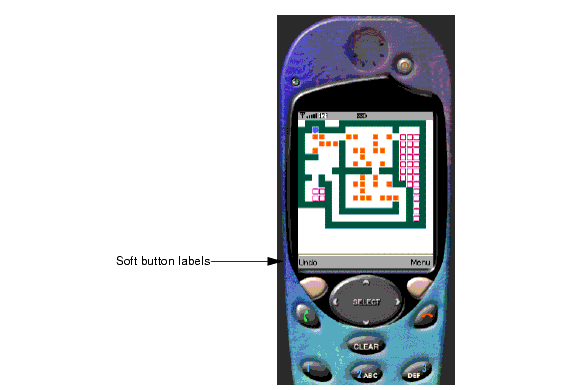
On devices with soft buttons, soft button labels are displayed in the area of the screen that is available to icons. This area is not directly accessible to the application. FIGURE 7 shows the soft button labels Undo and Menu on the lower part of the device screen.
A soft button label display is defined by a line of the form:
where the parameters are defined as follows:
For example:
Three properties are provided to control the color in the Emulator:
isColor property determines whether the display is grayscale (false) or color (true).colorCount property controls the number of colors available (when isColor is true) or the number of shades of gray available (when isColor is false). gamma property determines the level of gamma correction to be used when displaying the device's screen. The default value of this property is 1.0.For example:
Sounds that are played when alert with sound is displayed can be specified.
Default sound can be specified by setting the option:
This sound file will be used for all alerts where an alert-specific sound is not defined. Sound for each alert can be defined by:
where the possible values of <alert_type> are as defined by MIDP specification as follows:
If no sound file is defined (no alert-specific sound and no default sound) for a particular alert, the emulator does not play the sound and the corresponding MIDP API method AlertType.playSound() method returns the value false.
The Emulator supports all sound file formats currently supported by JDK1.4:
The Default Emulator in the J2ME Wireless Toolkit enables you to define device emulations with additional capabilities that are not required by the MIDP specification. Specifically,
This section describes how to use these options.
A locale is a geographic or political region or community that shares the same language, customs, or cultural convention. In software, a locale is a collection of files, data, and code, which contains the information necessary to adapt software to a specific geographical location.
Some operations are locale-sensitive and require a specified locale to tailor information for users, such as:
In the Default Emulator, the default locale is determined by the platform’s locale. To define a default locale, use the following definition:
A locale name is comprised of two parts separated by an dash (-), for example, en-US is the locale designation for english/United States while en-AU is the designation for english/Australia.
The first part is a valid ISO Language Code. These codes are the lower-case two-letter codes as defined by ISO-639. You can find a full list of these codes at a number of sites, such as:
http://www.ics.uci.edu/pub/ietf/http/related/iso639.txt
The second part is a valid ISO Country Code. These codes are the upper-case two-letter codes as defined by ISO-3166. You can find a full list of these codes at a number of sites, such as:
http://www.chemie.fu-berlin.de/diverse/doc/ISO_3166.html
The input/output APIs in CLDC use named character encodings to convert 8-bit characters into 16-bit Unicode characters, and vice-versa. A MIDP implementation might make only a small set of encodings available for MIDlets to use.
In the Default Emulator, the default encoding is default encoder of the platform you are running on. Your emulator might use other encodings, such as UTF-8 and UTF-16, providing they are available in the J2SE platform.
To define the default character encoding used by the emulator, use the following definition:
To define the set of all available encodings, use the following definition:
For example:
microedition.encoding: UTF-8

microedition.encoding.supported: UTF-8, UTF-16, ISO-8859-1, ISO-8859-2, Shift_JIS
To support all encodings supported by the J2ME platform, leave the microedition.encoding.supported definition blank, as in:
microedition.encoding.supported entry.
The Default Emulator supports the alpha channel in the image data by default. To disable the alpha channel in the image data, change the value of the enableAlphaChannel property from true to false:
|
|
Basic Customization Guide Java™ 2 Platform, Micro Edition, Wireless Toolkit, Version 2.1 |
Copyright © 2003 Sun Microsystems, Inc. All rights reserved.