Fall Semester, 1998
Layouts
© 1998, All Rights Reserved, SDSU & Roger Whitney
San Diego State University -- This page last updated 21-Dec-98
|
|
CS 596 Java Programming Fall Semester, 1998 Layouts |
|
|---|---|---|
|
© 1998, All Rights Reserved, SDSU & Roger Whitney San Diego State University -- This page last updated 21-Dec-98 |
Layouts
Need to specify where items will appear in a window that changes size
Layouts provide a flexible way to place items in a window without specifying coordinates
Layouts determine place components will be seen on the screen
A component can be:
| Button | Label | Scrollbar |
| Canvas | List | TextArea |
| Checkbox | Panel | TextField |
About LayoutsBorderLayout
Divides its components into regions
CardLayout
CardLayout contains cards
Each card contains one component
One card can be shown at a time
FlowLayout
Displays components left to right, top to bottom
GridLayout
Displays components in a grid of rows and columns
GridBagLayout
You can do almost anything with this once you understand it
Types Of LayoutsLayoutManager Interface Basic LayoutManager
All Layouts implement this interface
Methods
These methods are used by the container classes. In general, your code does not use these methods.
addLayoutComponent(String, Component)
layoutContainer(Container)
minimumLayoutSize(Container)
preferredLayoutSize(Container)
removeLayoutComponent(Component)
LayoutManager2 Interface for layouts with constraints.
Sub-interface of LayoutManager
Methods
In general, your code does not use these methods.
addLayoutComponent(Component, Object)
|
Layout
Manager
|
Implements
|
Constraints
|
|
BorderLayout |
LayoutManager2 |
Compass
point string
|
|
CardLayout |
LayoutManager2 |
Card
name string
|
|
FlowLayout |
LayoutManager |
none |
|
GridBagLayout |
LayoutManager2 |
GridBagConstraints |
|
GridLayout |
LayoutManager |
none |
Preferred/Minimum Sizes
Components have a preferred size and a minimum size
BorderLayout
FlowLayout
Constructors FlowLayout()
addLayoutComponent(String, Component) getAlignment() getHgap() getVgap() layoutContainer(Container) minimumLayoutSize(Container) preferredLayoutSize(Container) removeLayoutComponent(Component) setAlignment(int) setHgap(int) setVgap(int) toString()
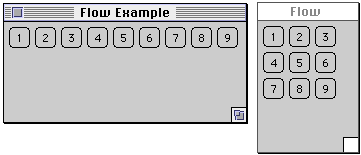
How A FlowLayout Works A simple FlowLayout example.
import java.awt.*; class FlowExample extends Frame { public FlowExample( int width, int height ) { setTitle( "Flow Example" ); setSize( width, height ); setLayout( new FlowLayout( FlowLayout.LEFT) ); for ( int label = 1; label < 10; label++ ) add( new Button( String.valueOf( label ) ) ); show(); } public static void main( String args[] ) { new FlowExample( 175, 100 ); new FlowExample( 175, 100 ); } }
Alignment Examples
This example shows the different alignments in a FlowLayout.
import java.awt.*; class AlignmentExample extends Frame { public AlignmentExample( int width, int height, String title, int alignment ) { setTitle( title ); setSize( width, height ); setLayout( new FlowLayout( alignment) ); add( new Button( "one") ); add( new Button( "two") ); show(); } public static void main( String args[] ) { new AlignmentExample( 150, 50, "Left", FlowLayout.LEFT); new AlignmentExample( 150, 50, "Right", FlowLayout.RIGHT); new AlignmentExample( 150, 50, "Center", FlowLayout.CENTER); } }
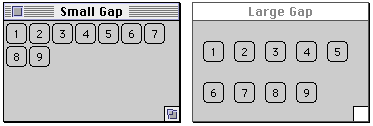
Gap Example
class GapExample extends Frame { public GapExample( int width, int height, String title, int HorizontalGap, int VerticalGap ) { setTitle( title ); setSize( width, height ); setLayout( new FlowLayout( FlowLayout.LEFT, HorizontalGap,VerticalGap) ); for ( int label = 1; label < 10; label++ ) add( new Button( String.valueOf( label ) ) ); show(); } public static void main( String args[] ) { new GapExample( 175, 100, "Small Gap", 2, 2 ); new GapExample( 175, 100, "Large Gap", 10, 20 ); } }
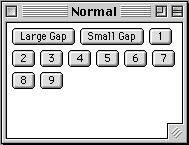
Changing the Gap
This example shows how to change the gap on the fly. The next slide shows the changing of the gap.
import java.awt.*; import java.awt.event.ActionListener; import java.awt.event.ActionEvent; class GapChangeExample extends Frame { Button large = new Button( "Large Gap" ); Button small = new Button( "Small Gap" ); public GapChangeExample( int width, int height ) { setTitle( "Normal" ); setSize( width, height ); setLayout( new FlowLayout( FlowLayout.LEFT ) ); add( large ); add( small ); GapListener aListener = new GapListener(); for ( int label = 1; label < 10; label++ ) { Button aButton = new Button( String.valueOf( label ) ); add( aButton ); aButton.addActionListener( aListener ); } large.addActionListener( aListener ); small.addActionListener( aListener ); show(); } public static void main( String args[] ) { new GapChangeExample( 175, 100); }
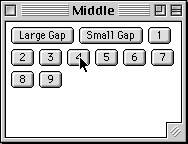
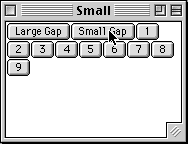
Changing the Gap This is the important slide of the example. It shows how to change the gap. Once that is done one also has to mark the layout as invalidated and then tell the window to validate itself. If this is not done, the change will not be seen in the window.
class GapListener implements ActionListener { public void actionPerformed( ActionEvent event ) { Button selectedButton = (Button) event.getSource(); int newGap; if ( selectedButton == small ) { newGap = 1; GapChangeExample.this.setTitle( "Small"); } else if ( selectedButton == large ) { newGap = 20; GapChangeExample.this.setTitle( "Large"); } else { newGap = 5; GapChangeExample.this.setTitle( "Middle"); } FlowLayout myLayout = (FlowLayout) GapChangeExample.this.getLayout(); myLayout.setHgap( newGap ); myLayout.setVgap( newGap ); GapChangeExample.this.invalidate(); GapChangeExample.this.validate(); } } }
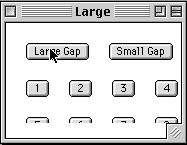
Changing the Gap Here are the different gaps from the example.
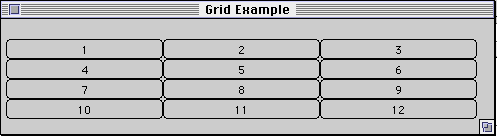
GridLayout
Constructors GridLayout(int, int)
addLayoutComponent(String,Component)
layoutContainer(Container)
minimumLayoutSize(Container)
preferredLayoutSize(Container)
removeLayoutComponent(Component)
toString()
A layout manager for a container that lays out grids
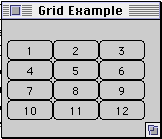
import java.awt.*;
class  GridLayoutExample  extends Frame  {

   public GridLayoutExample( int  widthInPixels, int heightInPixels ) {
      setTitle( "Grid Example" );
      setSize( widthInPixels, heightInPixels );
      int numberOfRows = 4;
      int numberOfColumns = 3;
      setLayout( new GridLayout( numberOfRows,
                            numberOfColumns ) );

      for ( int label = 1; label < 13; label++ )
         add( new Button( String.valueOf( label ) ) );
      show();
   }

   public  static  void  main( String  args[] ) {
      new  GridLayoutExample( 175, 100 );
   }
}
BorderLayout
addLayoutComponent(String,Component) layoutContainer(Container) minimumLayoutSize(Container) preferredLayoutSize(Container) removeLayoutComponent(Component) toString()
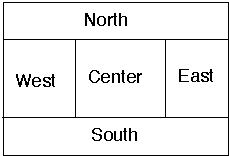
The "North", "South", "East" and "West" components get placed and sized according to their preferred sizes and the constraints of the container's size.
The "Center" component will get any space left over.
The default layout for a frame is BorderLayout.
BorderLayout
import java.awt.*; class BorderLayoutExample extends Frame { public BorderLayoutExample( int widthInPixels, int heightInPixels ) { setTitle( "BorderLayout Example" ); setSize( widthInPixels, heightInPixels ); setLayout( new BorderLayout() ); add( new Button( "North" ), BorderLayout.NORTH ); add( new Button( "Center" ), BorderLayout.CENTER ); add( new Scrollbar( Scrollbar.VERTICAL ), BorderLayout.EAST ); add( new Scrollbar( Scrollbar.HORIZONTAL ), BorderLayout.SOUTH ); show(); } public static void main( String args[] ) { new BorderLayoutExample( 175, 100 ); } }
CardLayout
Methods addLayoutComponent(String,Component) first(Container) last(Container) layoutContainer(Container) minimumLayoutSize(Container) next(Container) preferredLayoutSize(Container) previous(Container) removeLayoutComponent(Component) show(Container,String) toString()
A layout manager for a container that contains several 'cards'. Only one card is visible at a time, allowing you to flip through the cards.
Example import java.awt.*; import java.awt.event.ActionListener; import java.awt.event.ActionEvent; class CardLayoutExample extends Frame { CardLayout threeCards; Panel deck; public CardLayoutExample( int widthInPixels, int heightInPixels ) { setTitle( "CardLayoutExample Example" ); setSize( widthInPixels, heightInPixels ); setLayout( new BorderLayout() ); threeCards = new CardLayout(); deck = new Panel(); deck.setLayout( threeCards ); deck.add( "Ace", new Button( "Ace" ) ); deck.add( "King", new Button( "King" ) ); deck.add( "Queen", new Button( "Queen" ) ); add( deck, BorderLayout.CENTER ); Button next = new Button( "Next" ); next.addActionListener( new NextListener() ); add( next, BorderLayout.NORTH ); show(); } public static void main( String args[] ) { new CardLayoutExample(200, 200); } class NextListener implements ActionListener { public void actionPerformed( ActionEvent buttonPressed ) { threeCards.next( deck ); } } }
GridBagConstrants
gridx, gridy
| CENTER | NORTHEAST | SOUTHEAST |
| EAST | NORTHWEST | SOUTHWEST |
| NORTH | SOUTH | WEST |
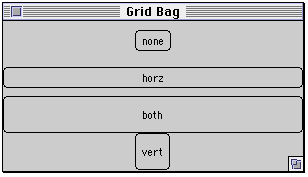
Fill Example
class GridBagExample extends Frame { public GridBagExample( int width, int height ) { setTitle( "Grid Bag" ); setSize( width, height ); GridBagLayout aLayout = new GridBagLayout(); GridBagConstraints constraints = new GridBagConstraints(); setLayout( aLayout ); constraints.gridx = 0; // Start column constraints.gridy = 0; // Start row constraints.gridwidth = 2; // Num. of columns wide constraints.gridheight = 1; // Num. of rows high constraints.weighty = 100; constraints.weightx = 100; constraints.anchor = GridBagConstraints.CENTER; constraints.fill = GridBagConstraints.NONE; Button none = new Button( "none" ); aLayout.setConstraints( none, constraints ); constraints.gridy = 1; constraints.fill = GridBagConstraints.HORIZONTAL; Button horz = new Button( "horz" ); aLayout.setConstraints( horz, constraints ); constraints.gridy = 2; constraints.fill = GridBagConstraints.BOTH; Button both = new Button( "both" ); aLayout.setConstraints( both, constraints ); constraints.gridy = 3; constraints.fill = GridBagConstraints.VERTICAL; Button vert = new Button( "vert" ); aLayout.setConstraints( vert, constraints ); add( none ); add( both ); add( horz ); add( vert ); show(); } }
Fill Example
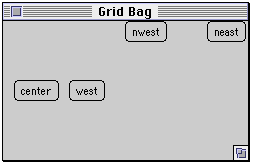
Anchor Example
class GridBagExample extends Frame { public GridBagExample( int width, int height ) { setTitle( "Grid Bag" ); setSize( width, height ); GridBagLayout aLayout = new GridBagLayout(); GridBagConstraints constraints = new GridBagConstraints(); setLayout( aLayout ); constraints.gridx = 0; // Start column constraints.gridy = 0; // Start row constraints.gridwidth = 1; // Num. of columns wide constraints.gridheight = 1; // Num. rows high constraints.weighty = 100; constraints.weightx = 100; constraints.anchor = GridBagConstraints.CENTER; constraints.fill = GridBagConstraints.NONE; Button center = new Button( "center" ); aLayout.setConstraints( center, constraints ); constraints.gridx = 1; constraints.anchor = GridBagConstraints.WEST; Button west = new Button( "west" ); aLayout.setConstraints( west, constraints ); constraints.gridx = 2; constraints.anchor = GridBagConstraints.NORTHWEST; Button nwest = new Button( "nwest" ); aLayout.setConstraints( nwest, constraints ); constraints.gridx = 3; constraints.anchor = GridBagConstraints.NORTHEAST; Button neast = new Button( "neast" ); aLayout.setConstraints( neast, constraints ); add( center ); add( nwest ); add( west ); add( neast ); show(); } }
Anchor Example
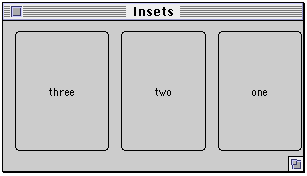
Inset Example
class GridBagExample extends Frame { public GridBagExample( int width, int height ) { setTitle( "Insets" ); setSize( width, height ); GridBagLayout aLayout = new GridBagLayout(); GridBagConstraints constraints = new GridBagConstraints(); setLayout( aLayout ); constraints.gridwidth = 1; // Num. of columns wide constraints.gridheight = 1; // Num. rows high int top = 10; int bottom = 20; int left = 12; int right = 0; constraints.insets = new Insets( top, left , bottom, right ); constraints.fill = GridBagConstraints.BOTH; constraints.weighty = 100; constraints.weightx = 100; constraints.gridx = 2; constraints.gridy = 0; Button one = new Button( "one" ); aLayout.setConstraints( one, constraints ); constraints.gridx = 1; Button two = new Button( "two" ); aLayout.setConstraints( two, constraints ); constraints.gridx = 0; Button three = new Button( "three" ); aLayout.setConstraints( three, constraints ); add( one ); add( two ); add( three ); show(); } }
Insets Example int top = 10; int bottom = 20; int left = 12; int right = 0; constraints.insets = new Insets( top, left , bottom, right );
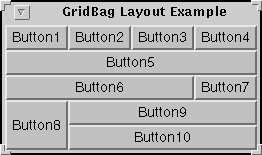
Relative/Remainder Example
Button1, Button2, Button3: weightx=1.0
Button4: weightx=1.0, gridwidth=GridBagConstraints.REMAINDER
Button5: gridwidth=GridBagConstraints.REMAINDER
Button6: gridwidth=GridBagConstraints.RELATIVE
Button7: gridwidth=GridBagConstraints.REMAINDER
Button8: gridheight=2, weighty=1.0,
Button9, Button 10: gridwidth=GridBagConstraints.REMAINDER
Copyright © 1998 SDSU & Roger Whitney, 5500 Campanile Drive, San Diego, CA 92182-7700 USA.
All rights reserved.
visitors since 24-Nov-98
 Q-nov24 3mins