Fall Semester, 2004
Installing Seaside & Cocoon
© 2004, All Rights Reserved, SDSU & Roger Whitney
San Diego State University -- This page last updated 13-Sep-04
|
|
Emerging Technology
Fall Semester, 2004 Installing Seaside & Cocoon |
|
|---|---|---|
|
© 2004, All Rights Reserved, SDSU & Roger Whitney San Diego State University -- This page last updated 13-Sep-04 |
CS 683 Emerging Technologies Fall Semester, 2004 Doc 7 Installing Seaside & Cocoon
Step One JDK 1.4 installed & JAVA_HOME
Copyright ©, All rights reserved. 2004 SDSU & Roger Whitney, 5500 Campanile Drive, San Diego, CA 92182-7700 USA. OpenContent ( http://www.opencontent.org/opl.shtml) license defines the copyright on this document.
| CS 683 Fall 04 | Doc 7, Installing Seaside & Cocoon Slide # 2 |
Seaside – A Multiple Control Flow Web Application Framework, Ducasse, Lienhard, Renggli, ESUG, Sept 6-10, 2004
http://www.iam.unibe.ch/~scg/Archive/Papers/Duca04eSeaside.pdf
| CS 683 Fall 04 | Doc 7, Installing Seaside & Cocoon Slide # 3 |
The course will be covering Seaside & Cocoon. Seaside is written in Smalltalk. Cocoon uses Java, XSLT, XML and Javascript. You decide which one you wish to work with.
Seaside runs in Squeak and VisualWorks. You may use either, but in this class I will only talk about the VisualWorks version.
Cocoon runs in a servlet container. There are a number of such servlet containers. Tomcat is a free servlet container. In this course I will use Tomcat 4.1.30 and Cocoon 2.0.4. There are more recent versions of both. Cocoon 2.0.4 is the last version of Cocoon with a binary distribution and it is nearly identical to the version covered in the text. It works with Tomcat 4.1.30. You can use other versions of Cocoon and Tomcat, but I will only talk about the versions listed above.
| CS 683 Fall 04 | Doc 7, Installing Seaside & Cocoon Slide # 4 |
If you are installing Seaside on a Unix machine in the directory containing your image create a directory called “psql_public_cst”. In that directory create a subdirectory called “Seaside”. You do not need to do this on a Windows machine.
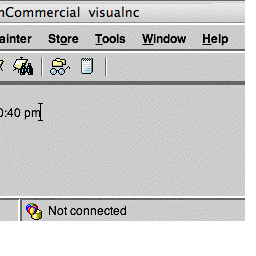
In VisualWorks 7.2 or 7.2.1 left click (keep the mouse button down) on the lower right pane labeled “Not connected” on the Launcher. You will get a popup menu. Select “Connect to Cincom Public Repository” in the pop up menu.
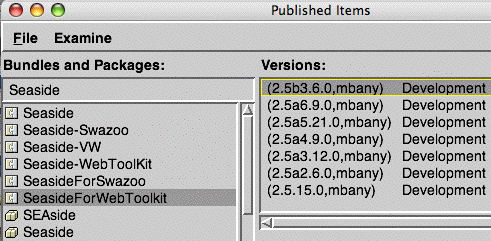
Once you have connected to the repository, the text in the lower right pane will change to something like: “Cincom Public Repository”. Once this happens right click (and hold the button down) to get another popup menu. In this menu select the item “Published Items”. After a short wait you will get a new window labeled “Published Items”.
| CS 683 Fall 04 | Doc 7, Installing Seaside & Cocoon Slide # 5 |
In this window type “Seaside” in the upper left pane as has shown below. Next select “SeasideForWebToolkit” in the second pane on the right. Once you have done this you will see a list of the Seaside versions in the pane labeled “Versions”. Select the latest version, which currently is 2.5b3.6.0.mbany.
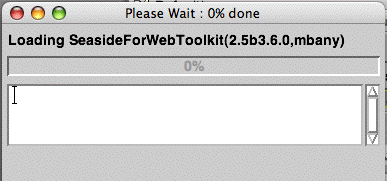
Now select the “Load” item in the “File” menu on the window. A dialog window will ask you if you want load that version of Seaside. Click on yes.

| CS 683 Fall 04 | Doc 7, Installing Seaside & Cocoon Slide # 6 |
Once you have done this, a progress window will appear. It will take 2-5 minutes for Seaside to completely to load. (Sometimes there are problems loading such a large application and you may need to restart the process.)
During the load process you will be asked to enter in an administrator name and password for the config site. Enter one and remember it. You will also be asked if you want to start a sample http server and a sample Seaside site. Answer yes to both. When the seaside is loaded, you can test the installation by accessing the following Url in a web browser on the same machine:
http://localhost:8008/seaside/go/counter
| CS 683 Fall 04 | Doc 7, Installing Seaside & Cocoon Slide # 7 |
Note that you will need to have about 100 Meg of disk space to install Cocoon.
The instructions for installing Tomcat and other Tomcat documentation is at:
http://jakarta.apache.org/tomcat/tomcat-4.1-doc/index.html
Go to http://apache.roweboat.net/jakarta/tomcat-4/v4.1.30/bin/
and download
jakarta-tomcat-4.1.30.tar.gz
Unzip the file using:
gunzip jakarta-tomcat-4.1.30.tar.gz
This creates the file jakarta-tomcat-4.1.30.tar. Untar the resulting file with the command:
tar -xf jakarta-tomcat-4.1.30.tar
This creates the directory jakarta-tomcat-4.1.30
Before running tomcat you need to set the environment variable JAVA_HOME. To do this I put the following line in my .cshrc file
setenv JAVA_HOME /opt/j2sdk1.4.0
| CS 683 Fall 04 | Doc 7, Installing Seaside & Cocoon Slide # 8 |
Now to start Tomcat. Go to the directory
jakarta-tomcat-4.1.30/bin
Now run the command startup.sh. I do this with:
./startup.sh
Here is a sample of starting tomcat
rohan 226-> ./startup.sh
Using CATALINA_BASE:   /home/ma/whitney/tomcat/jakarta-tomcat-4.1.30
Using CATALINA_HOME:   /home/ma/whitney/tomcat/jakarta-tomcat-4.1.30
Using CATALINA_TMPDIR: /home/ma/whitney/tomcat/jakarta-tomcat-4.1.30/temp
Using JAVA_HOME:       /opt/j2sdk1.4.0
It will take about a minute or so before tomcat is ready. At that point you can view the default tomcat web page. In a web browser go the the url:
http://rohan.sdsu.edu:8080/index.jsp
Go to the directory:
jakarta-tomcat-4.1.30/bin
Run the command
./shutdown.sh
Note that when you log off rohan your Tomcat server will still be running. If it runs too long it will be killed automatically.
| CS 683 Fall 04 | Doc 7, Installing Seaside & Cocoon Slide # 9 |
One of the problems with running tomcat on rohan is that other people may be running tomcat on rohan. So how do we know when we connect to the url above you are seeing a page from your tomcat?
To insure you are using your version of tomcat modify the index.jsp page. Go to the directory:
Edit the file:
On line 143 you will find:
<p><center><b>If you're seeing this page via a web browse
Edit the line so it contains your name like:
<p><center><b>From Roger Whitney. If you're seeing this page via a web browse
You need add your name or something that no other users would put in their page. Save the file and reload the page in your browser. If you don’t see the changed text you are not accessing your tomcat!
If two or more tomcats are running on rohan at the same time they need to use different ports. The default configuration of tomcat uses three ports. You need to change these ports so they are different than the default values. To do this you need to edit the configuration file. Go to the directory
jakarta-tomcat-4.1.30/conf
and make a copy of the file server.xml. Before you edit the file you must stop tomcat if it is running. If you edit the file while tomcat is running you will not be able to stop tomcat. Stop tomcat by running the command
shutdown.sh
located in the directory
jakarta-tomcat-4.1.30/bin
| CS 683 Fall 04 | Doc 7, Installing Seaside & Cocoon Slide # 10 |
After you make sure that tomcat is not running edit the file server.xml. On about line 13 you will find a line that looks like:
<Server port="8005" shutdown="SHUTDOWN" debug="0">
You need to change the value of the port. This port is used to shut down the server. It is used by the shell script shutdown.sh. We will talk about an algorithm in class to set this value. Then about line 93 you will find a line like:
port="8080" minProcessors="5" maxProcessors="75"
This follows the line that looks like:
<!-- Define a non-SSL Coyote HTTP/1.1 Connector on port 8080 -->
This is the port that you use in the web browser to connect to the tomcat server. Change the value and remember the new value.
Once you have done this on about line 114 after the line:
<!-- Define a Coyote/JK2 AJP 1.3 Connector on port 8009 -->
you will see a line like:
port="8009" minProcessors="5" maxProcessors="75"
Again change the value of the port.
Once you have done all this save the file and start tomcat. With a web browser connect to you tomcat. Do this will the url:
http://rohan.sdsu.edu:XXXX/index.jsp
where XXXX is the new port number you just gave the non-SSL Coyote HTTP/1.1 Connector.
| CS 683 Fall 04 | Doc 7, Installing Seaside & Cocoon Slide # 11 |
The main Cocoon web site is at:
http://cocoon.apache.org/
We will deal with Cocoon 2.0.4, whose main web site is at:
http://cocoon.apache.org/2.0/
Before installing Cocoon make sure that your tomcat is not running. To download Cocoon go to:
http://www.ibiblio.org/pub/mirrors/apache/cocoon/BINARIES/
and select the file:
cocoon-2.0.4-vm14-bin.tar.gz
uncompress the file using the command:
gunzip cocoon-2.0.4-vm14-bin.tar.gz
This produces the file cocoon-2.0.4-vm14-bin.tar. Untar the fie using the command:
tar -xf cocoon-2.0.4-vm14-bin.tar
This produces the directory cocoon-2.0.4. In this directory you will find a file called:
cocoon.war
move this file to the directory:
jakarta-tomcat-4.1.30/webapps/
If you have not done so turn off tomcat. Now start tomcat. After a minute or two you can access tomcat using a url like:
http://rohan.sdsu.edu:XXXX/index.jsp
where XXXX is the new port number you just gave the non-SSL Coyote HTTP/1.1 Connector, when you edited the file server.xml. Once you have know that tomcat is running again access:
http://rohan.sdsu.edu:XXXX/cocoon/
The first time you do this it will take several minutes for the server to respond. Be patient. If all goes we you will see a page welcoming you to Cocoon.
| CS 683 Fall 04 | Doc 7, Installing Seaside & Cocoon Slide # 12 |
Make sure that you have JDK 1.4 installed on your PC.
If you do not have JKD 1.4 go to:
http://java.sun.com/j2se/
and install it.
Once you know you have jkd 1.4 installed set the environment variable
JAVA_HOME
to the JDK home directory. I believe that this can be down using the command:
set JAVA_HOME =PathToJKDHome
The instructions for installing Tomcat and other Tomcat documentation is at:
http://jakarta.apache.org/tomcat/tomcat-4.1-doc/index.html
Go to http://apache.roweboat.net/jakarta/tomcat-4/v4.1.30/bin/
and download
jakarta-tomcat-4.1.30.exe
Run the file. This creates the directory jakarta-tomcat-4.1.30
Before running tomcat you need to set the environment variable JAVA_HOME. See step one about this.
| CS 683 Fall 04 | Doc 7, Installing Seaside & Cocoon Slide # 13 |
Now to start Tomcat. Go to the directory
jakarta-tomcat-4.1.30\bin
Now run the command
startup
It will take about a minute or so before tomcat is ready. At that point you can view the default tomcat web page. In a web browser go the url:
http://localhost:8080/index.jsp
The following should also work:
http://127.0.0.1:8080/index.jsp
Go to the directory:
jakarta-tomcat-4.1.30\bin
Run the command
shutdown
CS 683 Fall 04 Doc 7, Installing Seaside & Cocoon Slide # 14
The main Cocoon web site is at:
http://cocoon.apache.org/
We will deal with Cocoon 2.0.4, whose main web site is at:
http://cocoon.apache.org/2.0/
Before installing Cocoon make sure that your tomcat is not running. To download Cocoon go to:
http://www.ibiblio.org/pub/mirrors/apache/cocoon/BINARIES/
and select the file:
http://www.ibiblio.org/pub/mirrors/apache/cocoon/BINARIES/cocoon-2.0.4-vm14-bin.zip
Uncompress the file using your Windows zip program.
This produces the directory cocoon-2.0.4. In this directory you will find a file called:
cocoon.war
move this file to the directory:
jakarta-tomcat-4.1.30\webapps\
If you have not done so turn off tomcat. Now start tomcat. After a minute or two you can access tomcat using a url like:
http://localhost:8080/index.jsp
Once you have know that tomcat is running again access:
http://localhost:8080/cocoon/
The first time you do this it will take several minutes for the server to respond. Be patient. If all goes we you will see a page welcoming you to Cocoon.
Copyright ©, All rights reserved.
2004 SDSU & Roger Whitney, 5500 Campanile Drive, San Diego, CA 92182-7700 USA.
OpenContent license defines the copyright on this document.